JeVois-Pro supports the Intel Movidius Myriad-X Vector Processing Unit (VPU) as an optional add-on neural accelerator.
- Note
- JeVois-Pro only. This accelerator is not supported on JeVois-A33.
Supported neural network frameworks
- Caffe
- TensorFlow
- ONNX
- pyTorch (via export to ONNX)
- MXNet
- PaddlePaddle
- Kaldi
The VPU can run models with float16 (16-bit floating point) weights. It does not support standatd 32-bit float weights and hence conversion or compression is necessary.
For execution on VPU, your model will be converted on a Linux desktop to a proprietary blob format that can then be transferred to JeVois-Pro microSD for execution.
On JeVois-Pro, we run VPU models through OpenVino installed as a backend to OpenCV. Thus, the basic mechanism to load and run inference on a VPU model is OpenCV, like for models that run on CPU.
An emulation mode is available, using the JeVois-Pro CPU to run models optimized for VPU, through the ARM Compute Library and the OpenVino ARM CPU plugin. It is much slower, though. When a VPU is not connected to JeVois-Pro, all VPU networks are still available as VPUX to signal emulated mode. To the end user, this is completely transparent (no need to modify any settings).
Procedure
- Read and understand the JeVois docs about Running neural networks on JeVois-A33 and JeVois-Pro
- Make sure you understand the quantization concepts in Converting and Quantizing Deep Neural Networks for JeVois-Pro
- Check out the official OpenVino docs. In particular, we will use the Model Optimizer to convert custom models to VPU.
- The OpenVino docs are excellent and provide many conversion tutorials
- The Open Model Zoo provides many models that can be downloaded and converted to VPU (or are already converted).
- The VPU only supports a specific set of layer types. If you try to convert a network that contains unsupported layers, the conversion may sometimes seem to succeed but your converted network may fail to run. Check supported plugins and opset9 for some information.
- You need to download and install the OpenVino SDK to convert/compress your model on a desktop computer running Linux Ubuntu 20.04.
- Everything you need for runtime inference (OpenVino runtime libraries, OpenCV bindings, OpenVino ARM CPU plugin) is pre-installed on your JeVois microSD.
- Obtain a model: train your own, or download a pretrained model.
- Obtain some parameters about the model (e.g., pre-processing mean, stdev, scale, expected input image size, RGB or BGR, packed (NWHC) or planar (NCHW) pixels, etc).
- Copy model to JeVois microSD card under JEVOIS[PRO]:/share/dnn/custom/
- Create a JeVois model zoo entry for your model, where you specify the model parameters and the location where you copied your model files. Typically this is a YAML file under JEVOIS[PRO]:/share/dnn/custom/
- Launch the JeVois DNN module. It will scan the custom directory for any valid YAML file, and make your model available as one available value for the
pipe parameter of the DNN module's Pipeline component. Select that pipe to run your model.
Setting up the OpenVino SDK
- Note
- Everything below is to be run on a fast x86_64 desktop computer running Ubuntu 20.04 Linux, not on your JeVois-Pro camera. At the end, we will copy the converted model to microSD and then run inference on JeVois-Pro with that model.
We follow the official OpenVino installation instructions to install the OpenVino SDK on an Ubuntu 20.04 desktop:
- Create a python virtual env and get the OpenVino Development Tools:
python3 -m venv openvino_env
source openvino_env/bin/activate
python -m pip install --upgrade pip
pip install openvino-dev[tensorflow2,onnx,caffe,kaldi,mxnet,pytorch]
mo -h
Example: Object detection with YOLOv5s
1. Get the model
- Go to https://github.com/ultralytics/yolov5
- Let's download YOLOv5s which runs on 640x640 inputs. Either click on the latest Release and then on yolov5s.pt in the list of assets at the bottom, or run this:
wget https://github.com/ultralytics/yolov5/releases/download/v6.2/yolov5s.pt
- You will get yolov5s.pt, which is in pyTorch format.
- Unlike with the NPU or TPU, we do not need a sample dataset for the VPU, since we are just truncating 32-bit float to 16-bit float, which does not require detailed knowledge of the range of values that every layer will encounter ar runtime.
2. Since our model is pyTorch, convert it to ONNX first
3. Run the OpenVino model optimizer
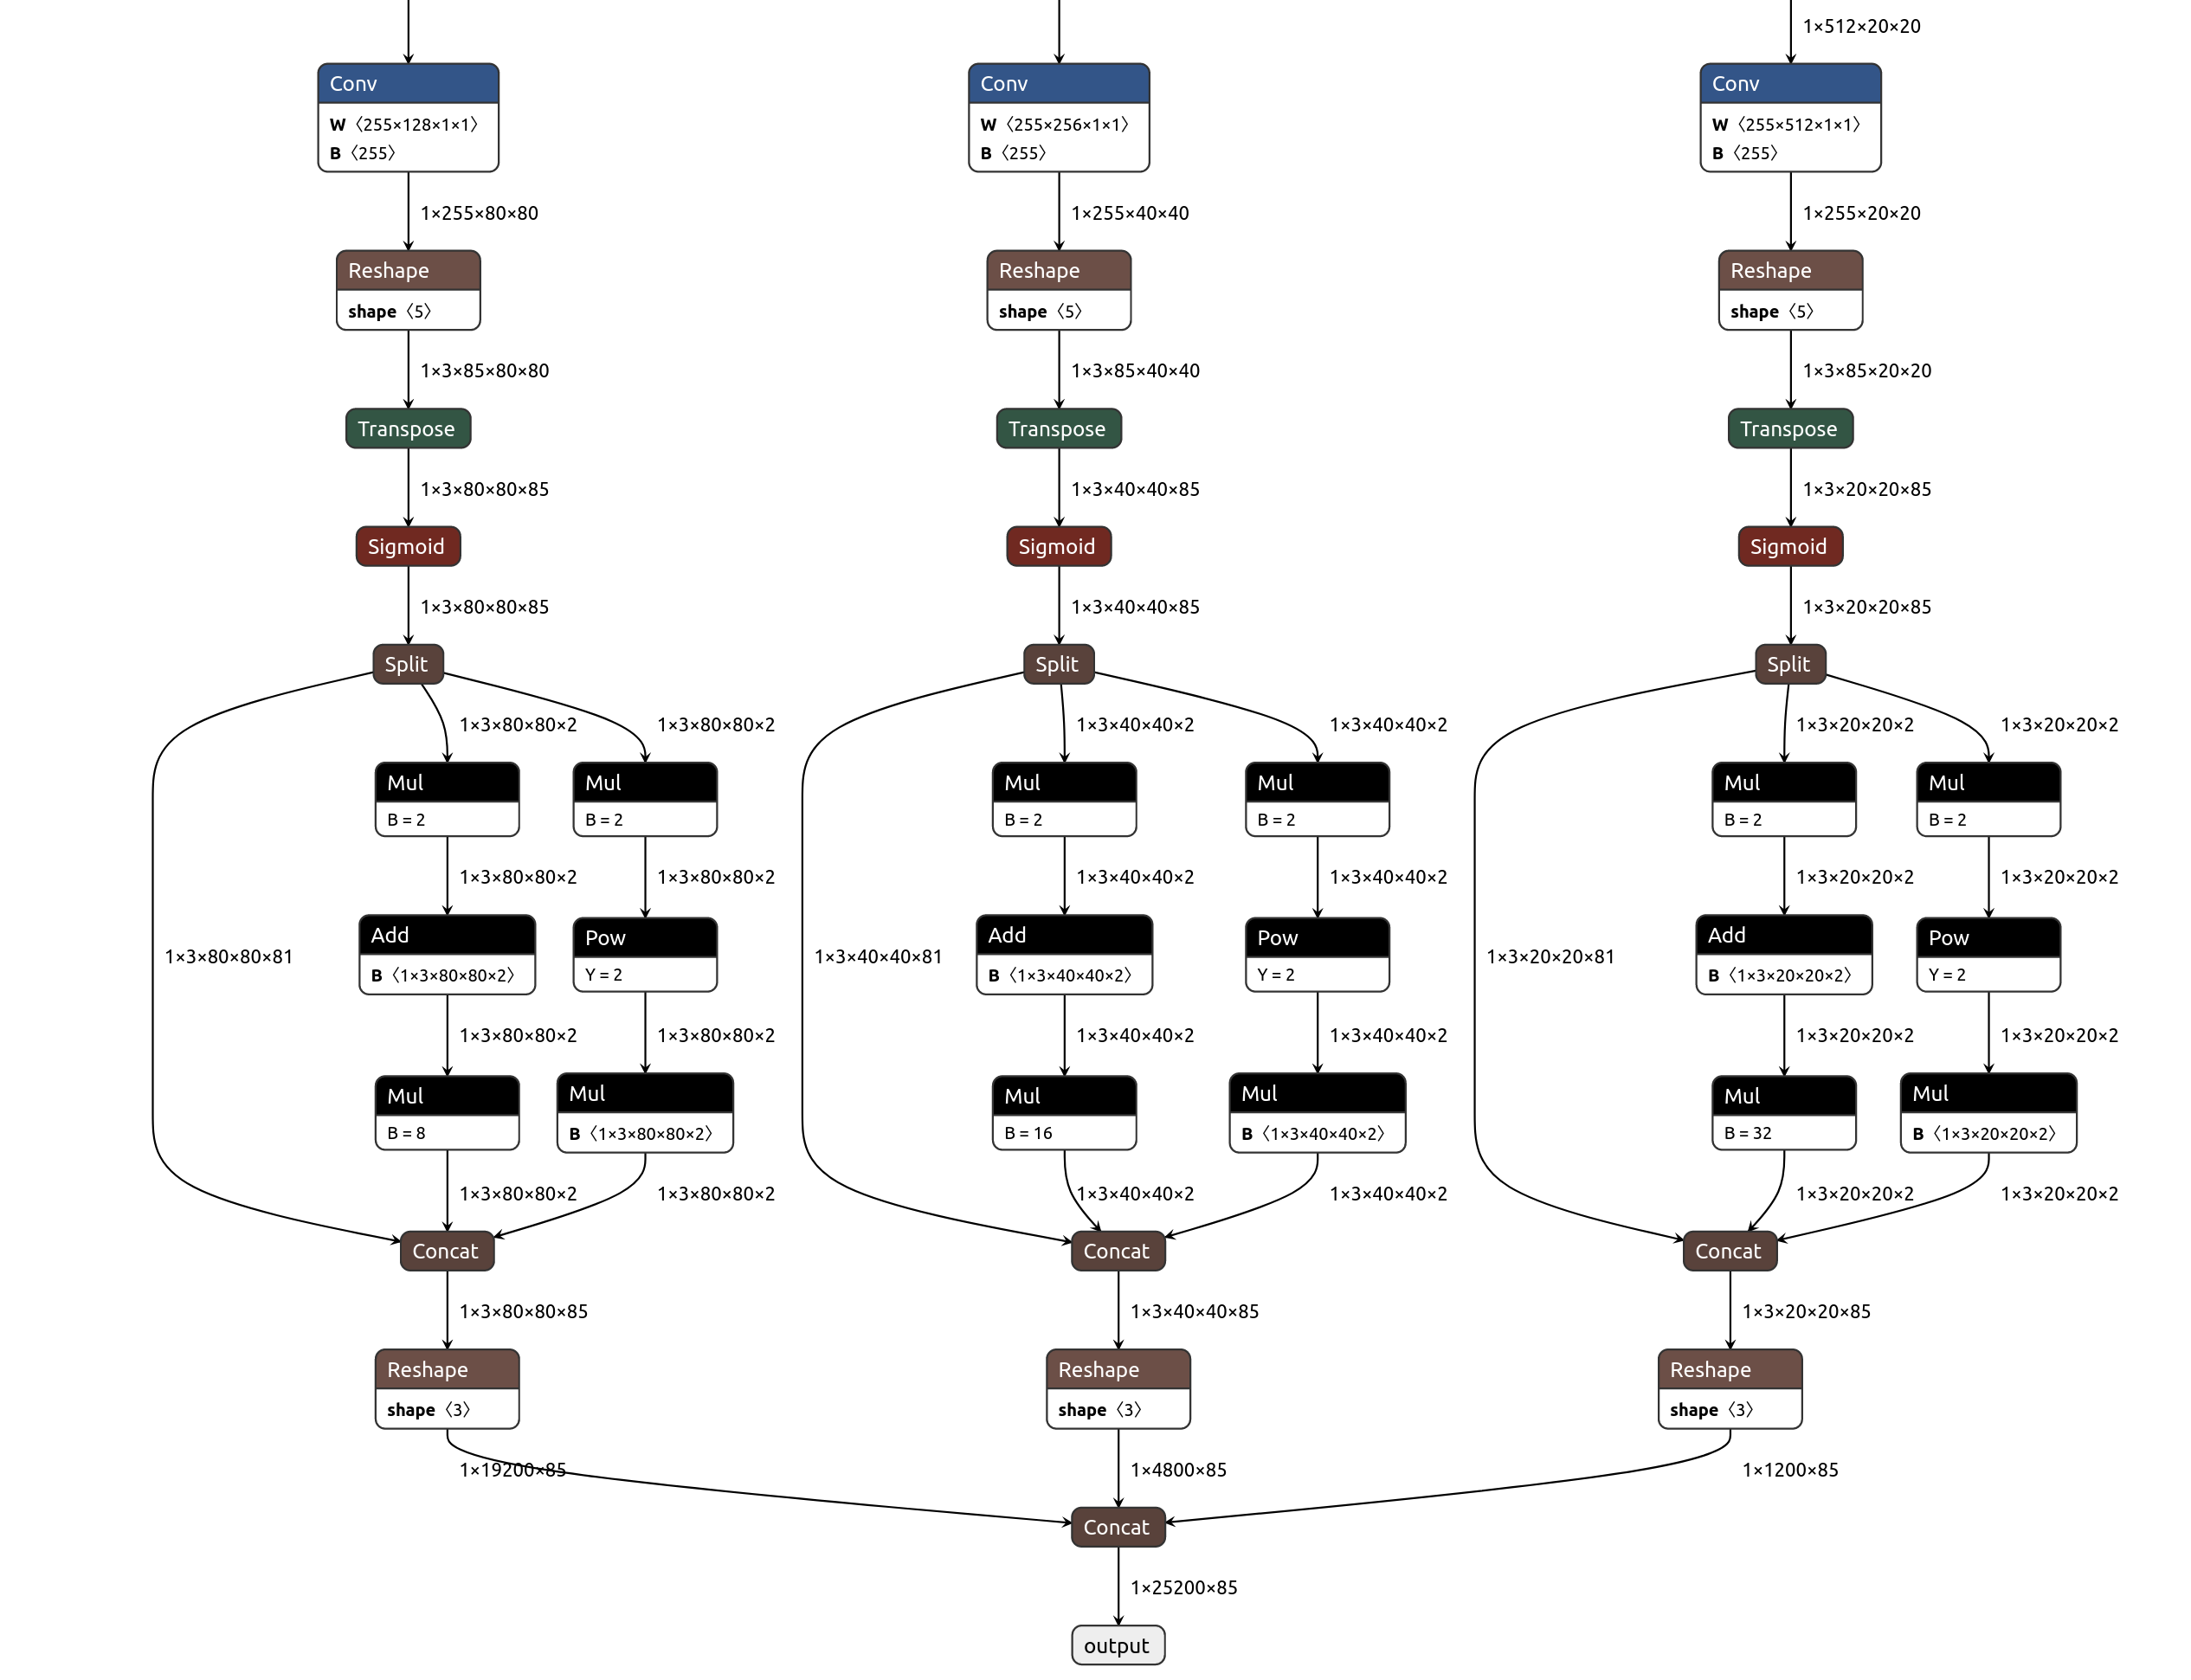
By default, the network outputs a single output tensor that concatenates the 3 YOLO scales, while most YOLO post-processors expect 3 separate outputs. So let's load our yolov5s.onnx into https://netron.app to find the 3 last Conv layers before final reshaping and concatenation. We find Conv_198 which outputs 1x255x80x80, Conv_232 which outputs 1x255x40x40, and Conv_266 which outputs 1x255x20x20. So we will use these outputs, which the JeVois PostProcessorDetect can handle.
Click on the image below to enlarge. If you click on each of the blue Conv layers in Netron, you will see their names.
Also have a look at https://github.com/violet17/yolov5_demo who did something similar.
We convert the model to float16 (FP16) for operation on Myriad-X VPU:
mo --input_model yolov5s.onnx -s 255 --data_type FP16 --output Conv_198,Conv_232,Conv_266
Parameter -s 255 will divide input pixels by 255 on device, so we can directly feed unscaled input pixels to the network. See mo --help for more options.
We obtain yolov5s.bin and yolov5s.xml which we can run on JeVois-Pro.
4. Create YAML zoo file
- We start with a similar entry from zoo file vpu.yaml already in the JeVois microSD (and available in the Config tab of the GUI).
- For YOLO post-processing, we need definitions of anchors (prototypical box shapes that will be used to predict object boxes). We just get those from https://github.com/ultralytics/yolov5/blob/master/models/yolov5s.yaml, towards top:
anchors:
- [10,13, 16,30, 33,23]
- [30,61, 62,45, 59,119]
- [116,90, 156,198, 373,326]
- Because YOLOv5 uses the "new style" of YOLO coordinates, we need to disable Post-Processor sigmoid and set Post-Processor scalexy to 2.0. You would usually want that for YOLOv5/v7. Conversely, set sigmoid to true and scalexy to 0.0 (defaults) to use old-style box coordinates for YOLOv2/v3/v4. You can look at the differences in jevois::dnn::PostProcessorDetectYOLO::yolo_one()
- Here, actually, it looks like these 3 Conv layers we used for our outputs have linear activation in that particular model. So we need to set sigmoid to true as the post-processor will require that for YOLO decoding.
- We just modify the name and file locations, bring all the global definitions that were in spu.yml into our file (like preproc, nettype, etc which were set globally in spu.yml and hence not repeated for the entry we are copying from), and end up with the following yolov5s.yml:
%YAML 1.0
---
yolov5s:
preproc: Blob
nettype: OpenCV
backend: InferenceEngine
target: Myriad
model: "dnn/custom/yolov5s.bin"
config: "dnn/custom/yolov5s.xml"
intensors: "NCHW:8U:1x3x640x640"
postproc: Detect
detecttype: RAWYOLO
anchors: "10,13, 16,30, 33,23; 30,61, 62,45, 59,119; 116,90, 156,198, 373,326"
classes: "npu/detection/coco-labels.txt"
sigmoid: true
scalexy: 2.0
- Note
- Here by just specifying intensors: "NCHW:8U:1x3x640x640" with no quantization details at the end of the spec, we instruct the JeVois pre-processor to just feed the raw input pixels with no value scaling (i.e., mean=[0 0 0], scale=1, stdev=[1 1 1]) and hence we skip specifying mean scale, and stdev altogether.
- We copy yolov5s.yml, yolo5s.xml, yolov5s.bin to /jevoispro/share/dnn/custom/ on JeVois-Pro and let's try it!
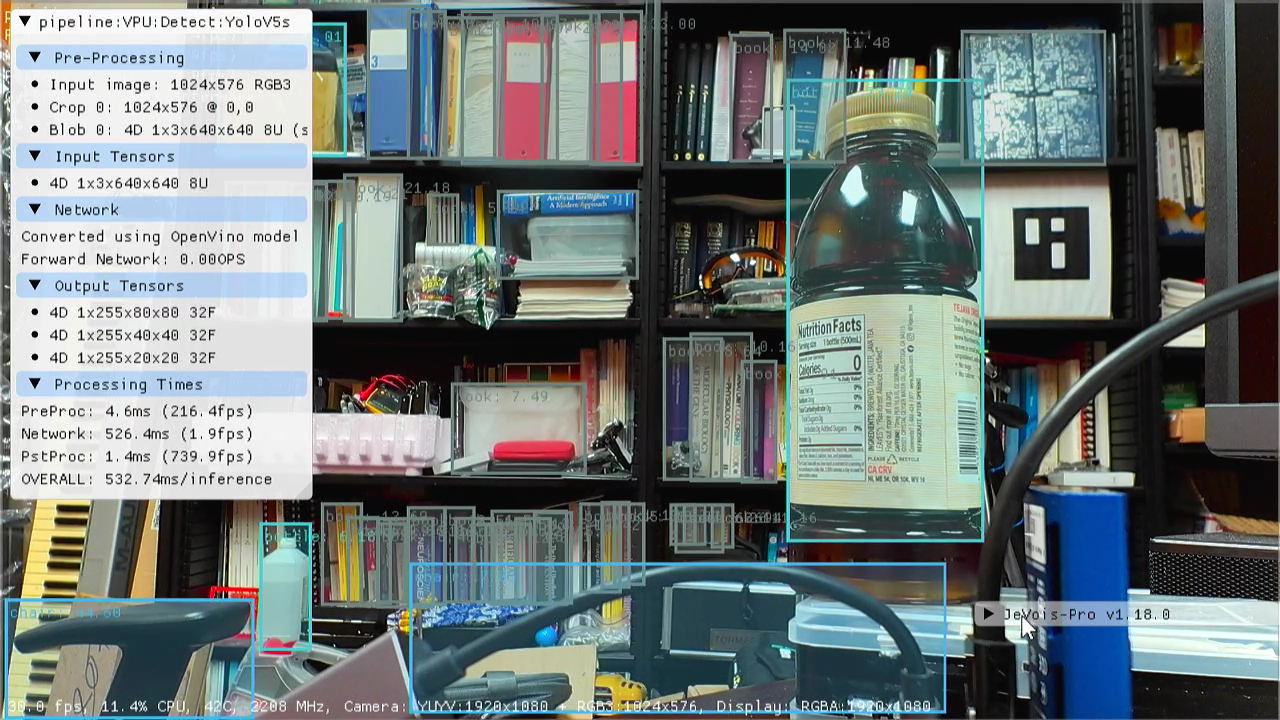
5. Test the model and adjust any parameters
- Select the DNN machine vision module
- Set the
pipe parameter to VPU:Detect:yolov5s
It works! This network is a bit big for the Myriad-X, running at only 1.9 FPS. A tiny version of the model, or using smaller input size, will get you higher frames/second.
Tips
 1.9.8
1.9.8
