|
| By Laurent Itti | itti@usc.edu | http://jevois.org | GPL v3 |
| |||
| Video Mapping: YUYV 320 266 30.0 YUYV 320 240 30.0 JeVois ArUcoBlob | |||
| Video Mapping: NONE 0 0 0.0 YUYV 320 240 30.0 JeVois ArUcoBlob |
Module Documentation
This modules 1) detects ArUco markers (small black-and-white geometric patterns which can be used as tags for some objects), and, in parallel, 2) isolates pixels within multiple given HSV ranges (hue, saturation, and value of color pixels), does some cleanups, and extracts object contours. It sends information about detected ArUco tags and color objects over serial.
This module was developed to allow students to easily develop visually-guided robots that can at the same time detect ArUco markers placed in the environment to signal certain key objects (e.g., charging station, home base) and colored objects of different kinds (e.g., blue people, green trees, and yellow fires).
This module usually works best with the camera sensor set to manual exposure, manual gain, manual color balance, etc so that HSV color values are reliable. See the file script.cfg file in this module's directory for an example of how to set the camera settings each time this module is loaded.
Since this is a combination module, refer to:
- DemoArUco for the ArUco algorithm and messages
- ObjectTracker for the blob detection algorithm and messages
The number of parallel blob trackers is determined by parameter numtrack, which should be set before the module is initialized, i.e., in the module's params.cfg file. It cannot be changed while the module is running.
The module runs at about 50 frames/s with 3 parallel blob detectors plus ArUco, at 320x240 camera sensor resolution. Increasing to 10 parallel blob detectors will still get you about 25 frames/s (but finding robust non-overlapping HSV ranges for all those detectors will become challenging!)
To configure parameters hrange, srange, and vrange for each detector in the module's scrip.cfg, we recommend that you do it one by one for each kind of colored object you want, using the ObjectTracker module (which shares the same color blob detection code, just for one HSV range) and the tutorial on Tuning the color-based object tracker using a python graphical interface, or the sliders in JeVois Inventor. Just make sure that both modules have the same camera settings in their respective script.cfg files.
Using the serial outputs
We recommend the following settings (to apply after you load the module, for example in the module's script.cfg file):
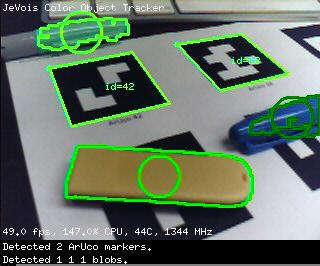
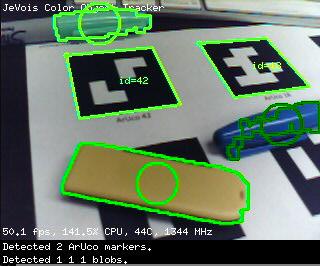
With a scene as shown in this module's screenshots, you would then get outputs like:
...
1557 N2 U42 -328 -9 706 569
1557 N2 U18 338 -241 613 444
1557 N2 blob0 616 91 406 244
1557 N2 blob1 28 584 881 331
1557 N2 blob2 47 -553 469 206
1558 N2 U42 -328 -9 706 569
1558 N2 U18 338 -241 613 444
1558 N2 blob0 547 113 519 275
1558 N2 blob1 28 581 881 338
1558 N2 blob2 47 -553 469 206
1559 N2 U42 -331 -13 700 563
1559 N2 U18 338 -244 613 450
1559 N2 blob0 369 153 200 194
1559 N2 blob0 616 94 381 250
1559 N2 blob1 28 581 881 338
1559 N2 blob2 47 -553 469 206
...
which basically means that, on frame 1557, ArUco markers U42 and U18 were detected, then blob detector named "blob0" (configured for light blue objects in script.cfg) detected one blob, then "blob1" (configured for yellow) also detected one, and finally "blob2" (configured for green) found one too. That was all for frame 1157, and we then switch to frame 1158 (with essentially the same detections), then frame 1159 (note how blob0 detected 2 different blobs on that frame), and so on. See Standardized serial messages formatting for more info about these messages.
See Standardized serial messages formatting for more on standardized serial messages, and Helper functions to convert coordinates from camera resolution to standardized for more info on standardized coordinates.
Running with no video output (standalone mode)
Try these settings in the global initialization script file of JeVois, which is executed when JeVois powers up, in JEVOIS:/config/initscript.cfg:
Make sure you do not have conflicting settings in the module's params.cfg or script.cfg file; as a reminder, the order of execution is: 1) initscript.cfg runs, which loads the module through the setmapping2 command; 2) as part of the loading process and before the module is initialized, settings in params.cfg are applied; 3) the module is then initialized and commands in script.cfg are run; 4) the additional commands following setmapping2 in initscript.cfg are finally run. Next time JeVois starts up, it will automatically load this module and start sending messages to the hardware 4-pin serial port, which you should then connect to an Arduino or other robot controller.
| Parameter | Type | Description | Default | Valid Values |
|---|---|---|---|---|
| (ArUcoBlob) numtrack | size_t | Number of parallel blob trackers to run. They will be named blob0, blob1, etc for parameters and serial messages | 3 | - |
| (ArUco) detparams | std::string | Filename of detector parameters, or empty - Note that this parameter cannot be changed at runtime (must be set in the module's params.cfg). | - | |
| (ArUco) dictionary | Dict | Symbol dictionary to use - Note that this parameter cannot be changed at runtime (must be set in the module's params.cfg). | Dict::D4X4_50 | Dict_Values |
| (ArUco) dopose | bool | Compute (and show) pose vectors, requires a valid camera calibration | false | - |
| (ArUco) markerlen | float | Marker side length (millimeters), used only for pose estimation | 100.0F | - |
| (ArUco) showcube | bool | Show a 3D cube on top of each detected marker, when dopose is also true | false | - |
| (BlobDetector) hrange | jevois::Range<unsigned char> | Range of H values for HSV window (0=red/do not use because of wraparound, 30=yellow, 45=light green, 60=green, 75=green cyan, 90=cyan, 105=light blue, 120=blue, 135=purple, 150=pink) | jevois::Range<unsigned char>(10, 245) | - |
| (BlobDetector) srange | jevois::Range<unsigned char> | Range of S (saturation) values for HSV window | jevois::Range<unsigned char>(10, 245) | - |
| (BlobDetector) vrange | jevois::Range<unsigned char> | Range of V (brightness) values for HSV window | jevois::Range<unsigned char>(10, 245) | - |
| (BlobDetector) maxnumobj | size_t | Max number of objects to declare a clean image | 10 | - |
| (BlobDetector) objectarea | jevois::Range<unsigned int> | Range of object area (in pixels) to track | jevois::Range<unsigned int>(20*20, 100*100) | - |
| (BlobDetector) erodesize | size_t | Erosion structuring element size (pixels) | 3 | - |
| (BlobDetector) dilatesize | size_t | Dilation structuring element size (pixels) | 8 | - |
params.cfg file# Optional parameter setting file to run each time the # module is loaded, BEFORE it is started. # # Only entries of the form "param = value" are allowed, # and you can only set the module's parameters here (not # any of the system parameters). # # Example: # # serstyle = Detail # For ArUcoBlob, you can change the number of parallel blob detectors here: numtrack = 3 |
script.cfg file# Optional script to run each time the module is loaded, # AFTER it is started. # # Commands in this file should be exactly as you would type # interactively into the JeVois command-line interface. # # Example: # # setcam brightness 1 # setpar cpumax 1200 # info # Set camera to fixed color balance, gain, and exposure, so that we get more reliable colors than we would obtain under # automatic mode: setcam autowb 1 setcam autogain 0 setcam autoexp 0 setcam redbal 110 setcam bluebal 170 setcam gain 16 setcam absexp 500 # Number of parallel threads has to be configured before the module is initialized. See params.cfg for this module. # Hue values: 0=red/do not use because of wraparound, 30=yellow, 45=light green, 60=green, 75=green cyan, 90=cyan, # 105=light blue, 120=blue, 135=purple, 150=pink # Saturation values: from 0 (grey) to 255 (saturated color) # Value (brightness) values: from 0 (dark) to 255 (bright) # Detect light blue objects for blob0: setpar blob0:hrange 95...110 setpar blob0:srange 100...255 setpar blob0:vrange 60...253 # Detect yellow objects for blob1: setpar blob1:hrange 15...45 setpar blob1:srange 100...255 setpar blob1:vrange 60...253 # Detect green objects for blob2: setpar blob2:hrange 50...80 setpar blob2:srange 100...255 setpar blob2:vrange 60...253 # Send info log messages to None, send serial strings from module to Hard serial port: setpar serlog None setpar serout Hard # Apply high gain to our pan/tilt servos, sending the commands below to our Arduino over the Hard serial port that we # configured above to handle the serout messages. The Arduino controlling the pan/tilt servos will receive and parse # these commands, and will set the servo gains: serout PANGAIN 400 serout TILTGAIN 300 |
| Detailed docs: | ArUcoBlob |
|---|---|
| Copyright: | Copyright (C) 2018 by Laurent Itti, iLab and the University of Southern California |
| License: | GPL v3 |
| Distribution: | Unrestricted |
| Restrictions: | None |
| Support URL: | http://jevois.org/doc |
| Other URL: | http://iLab.usc.edu |
| Address: | University of Southern California, HNB-07A, 3641 Watt Way, Los Angeles, CA 90089-2520, USA |