|
JeVois
1.23
JeVois Smart Embedded Machine Vision Toolkit
|
|
|
JeVois
1.23
JeVois Smart Embedded Machine Vision Toolkit
|
|
JeVois Inventor is a graphical frontend for JeVois-A33 Smart Cameras which runs on a host computer (PC, Mac, Linux). It makes programming new computer vision pipelines that run on JeVois very easy, using full Python + OpenCV.
JeVois Inventor is not used with JeVois-Pro. Instead, JeVois-Pro provides the same functionality directly in the camera. If you are using JeVois-Pro, you can skip this page.
This frontend was created for people who do not read user manuals, so feel free to explore around!
Nevertheless, here are a few tips.
jevois-inventor.exesudo dpkg -i jevois-inventor_XXX.deb # (XXX will vary depending on version)sudo killall ModemManager # (ModemManager interferes with JeVois)jevois-inventor sudo apt purge modemmanager
sudo usermod -aG dialout $USER
sudo usermod -aG video $USER and reboot your computer for the settings to take effect.CTRL+click on the JeVois Inventor icon and select Open from the pull-down menu. This should now open it.
See also:
Detection is fully automatic. No device to specify, no port to look for.
Just start JeVois Inventor, insert a microSD card with the latest JeVois software into your camera, and connect the camera to your host computer.
As soon as the camera is detected, the DemoSaliency machine vision module will start automatically.

You can disconnect JeVois at any time, and JeVois Inventor should detect that. Next time you connect JeVois, JeVois Inventor should also detect it again.
Troubleshooting:
sudo chmod 777 /dev/video0 /dev/ttyACM0 each time after JeVois has started (solid orange LED).Use the Vision Module menu to select a given machine vision module.
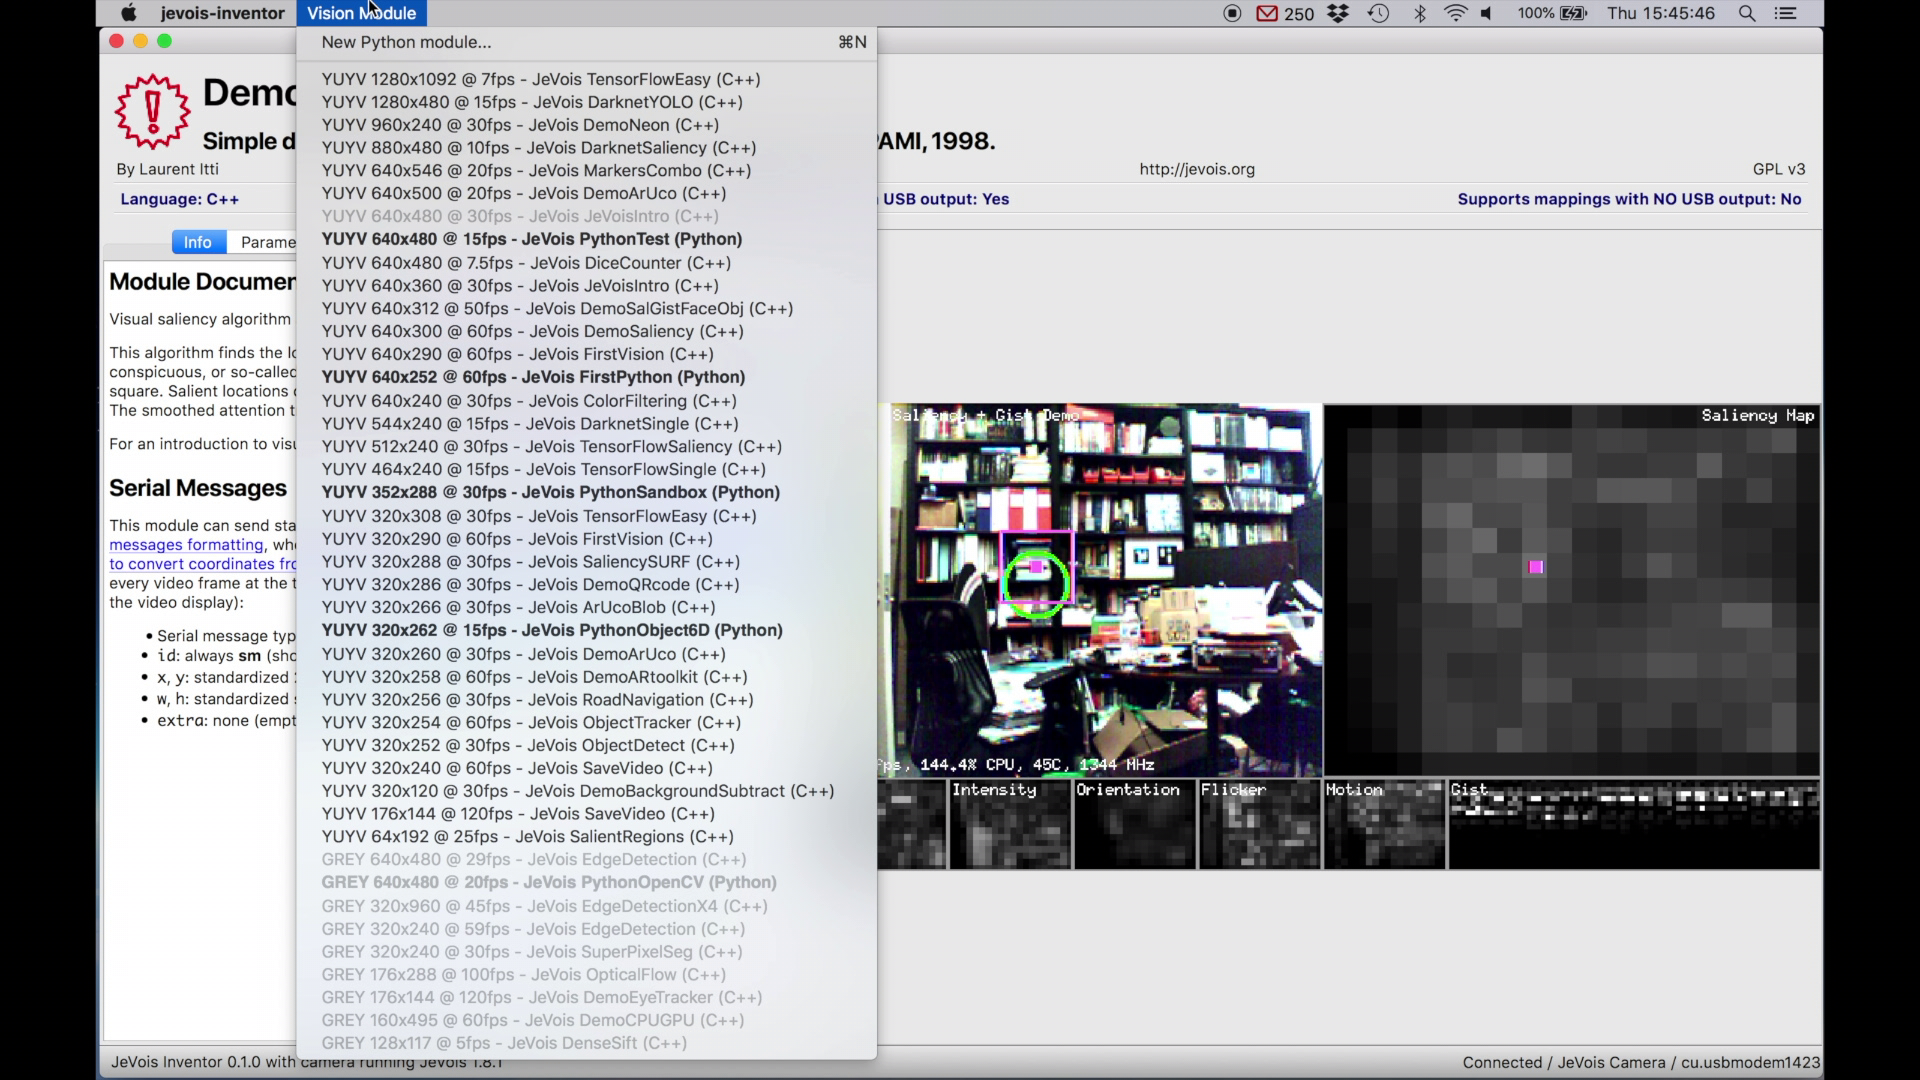
Modules written in Python are highlighted in bold font. You can edit the code for these modules directly in JeVois Inventor (see below).
Under the Info tab you can browse the module's documentation. You can zoom in/out by pressing CTRL + mouse wheel.
For more information: Now may be a good time to familiarize yourself with a few key concepts: Concepts used throughout this documentation
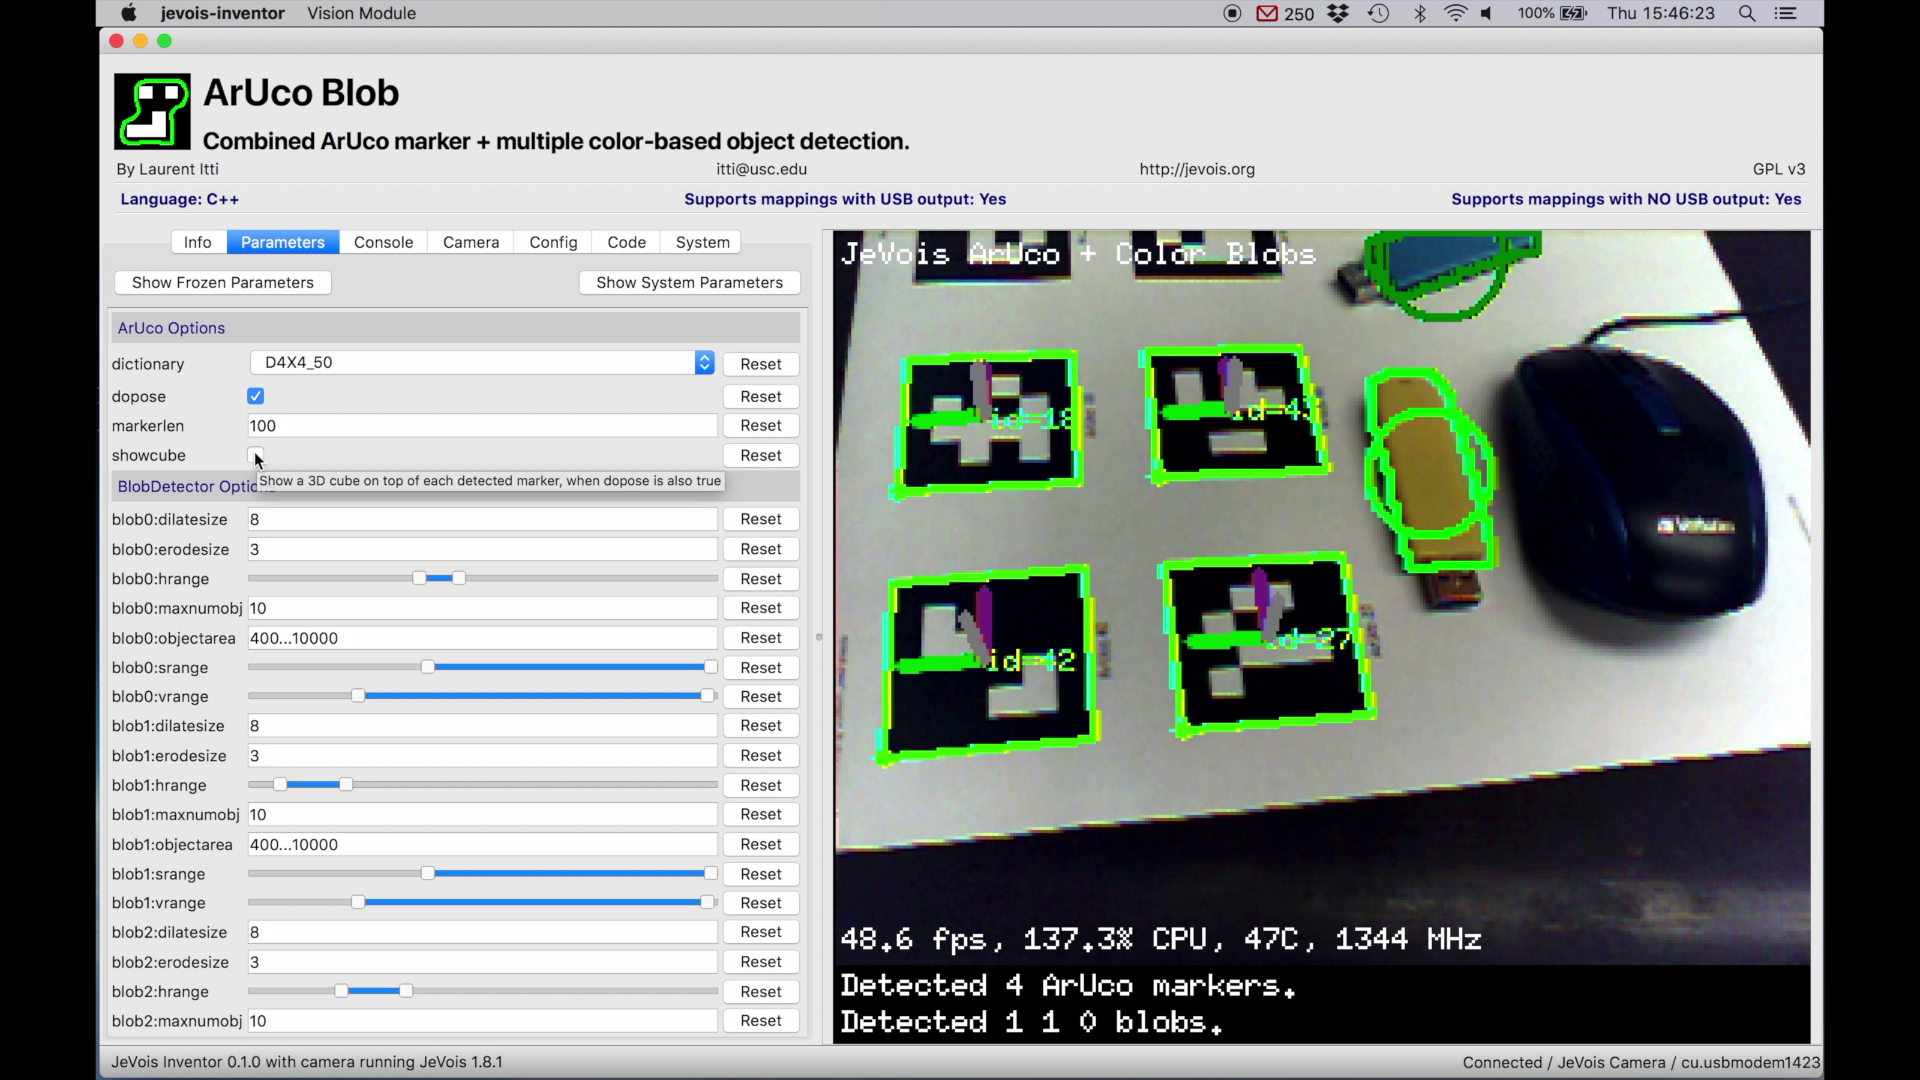
Many machine vision modules expose parameters that can be tuned by the user.
Click on the Parameters tab to see the current module's parameter.
JeVois provides a simple command-line interface to allow one to run commands, set parameters, etc over the 4-pin serial port of JeVois, or over the Serial-over-USB port (which JeVois Inventor uses).
Mainly, this interface is intended to allow micro-controllers or host computers to configure JeVois. In fact, each time you click a button in JeVois Inventor, a command is sent to JeVois using this command-line interface.
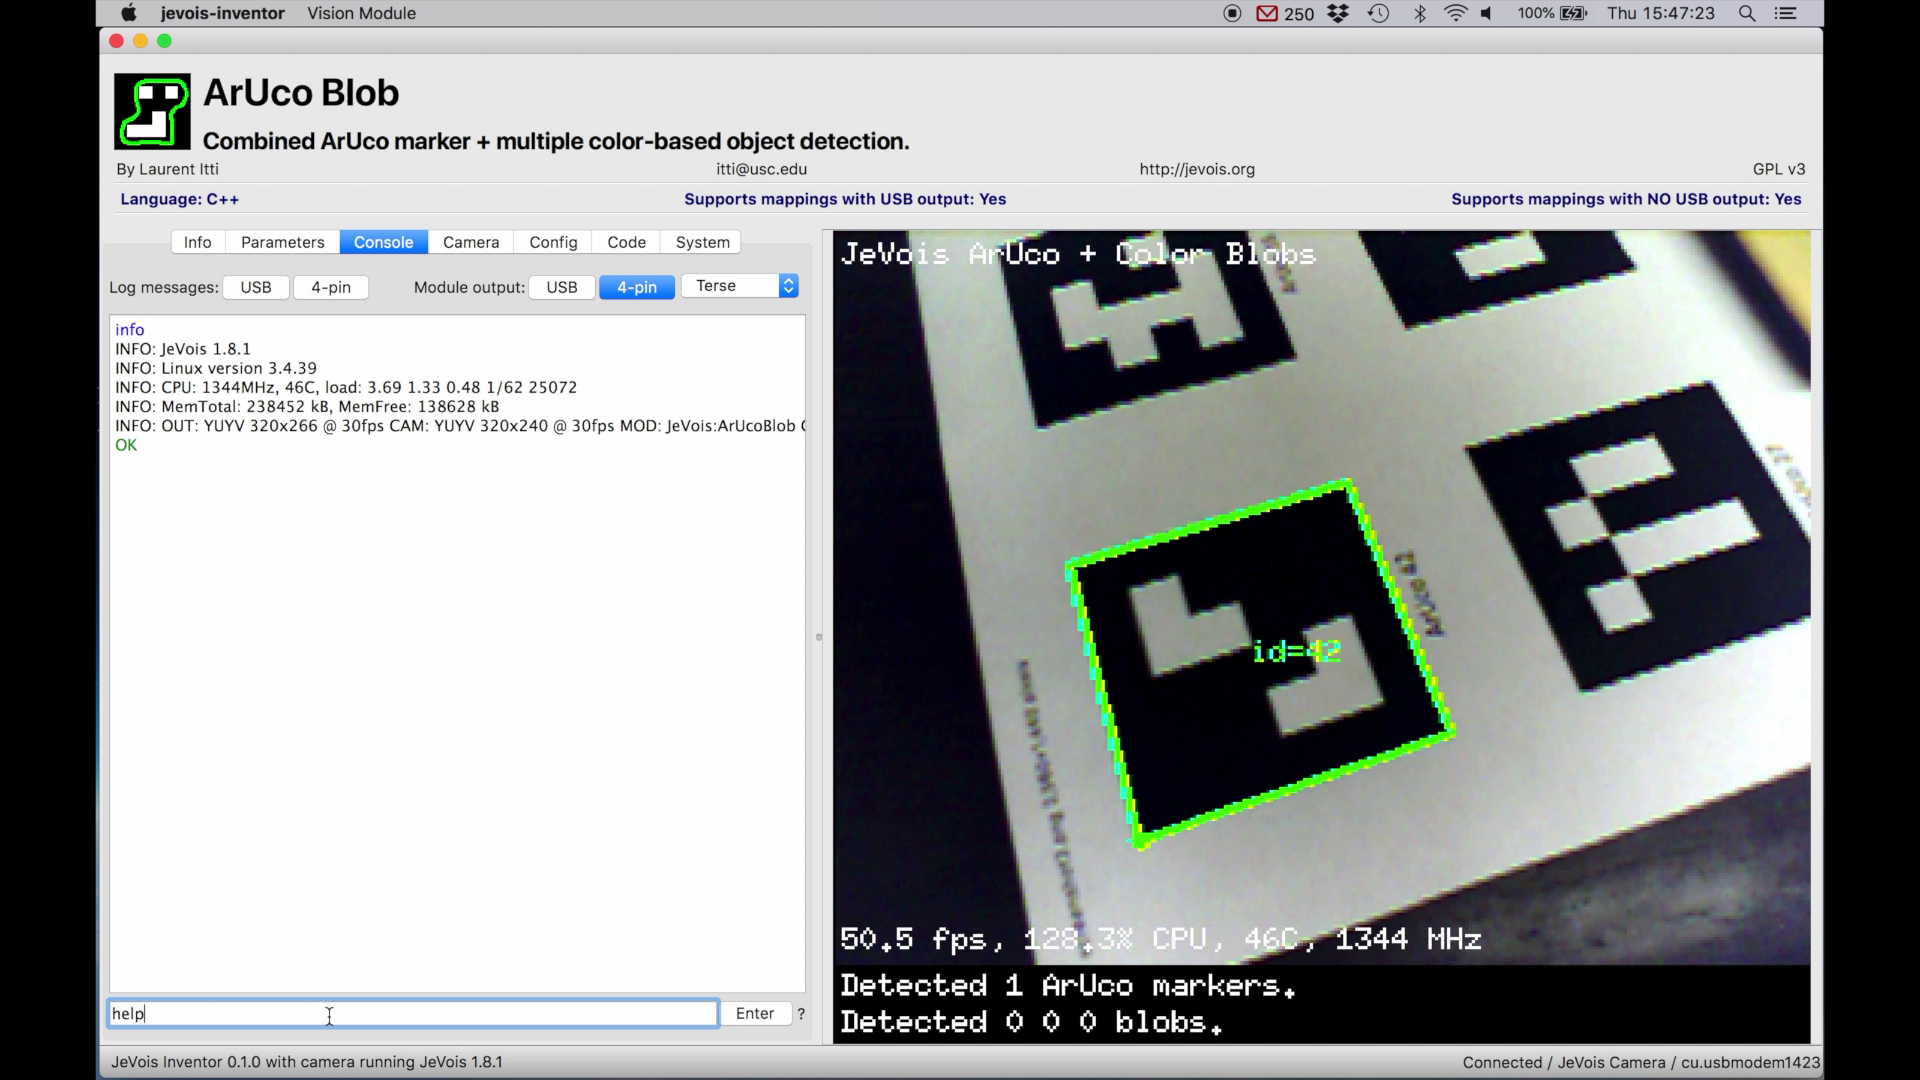
? next to the Enter button to see a list of currently available commands.At the top right, choose where to send module output messages (nowhere, to USB, to 4-pin serial port, or both). Module output messages contain results of what the current machine vision pipeline has found in the input video. For example, it may stream the names of recognized objects, or the coordinates and sizes of detected marker tags or color blobs.
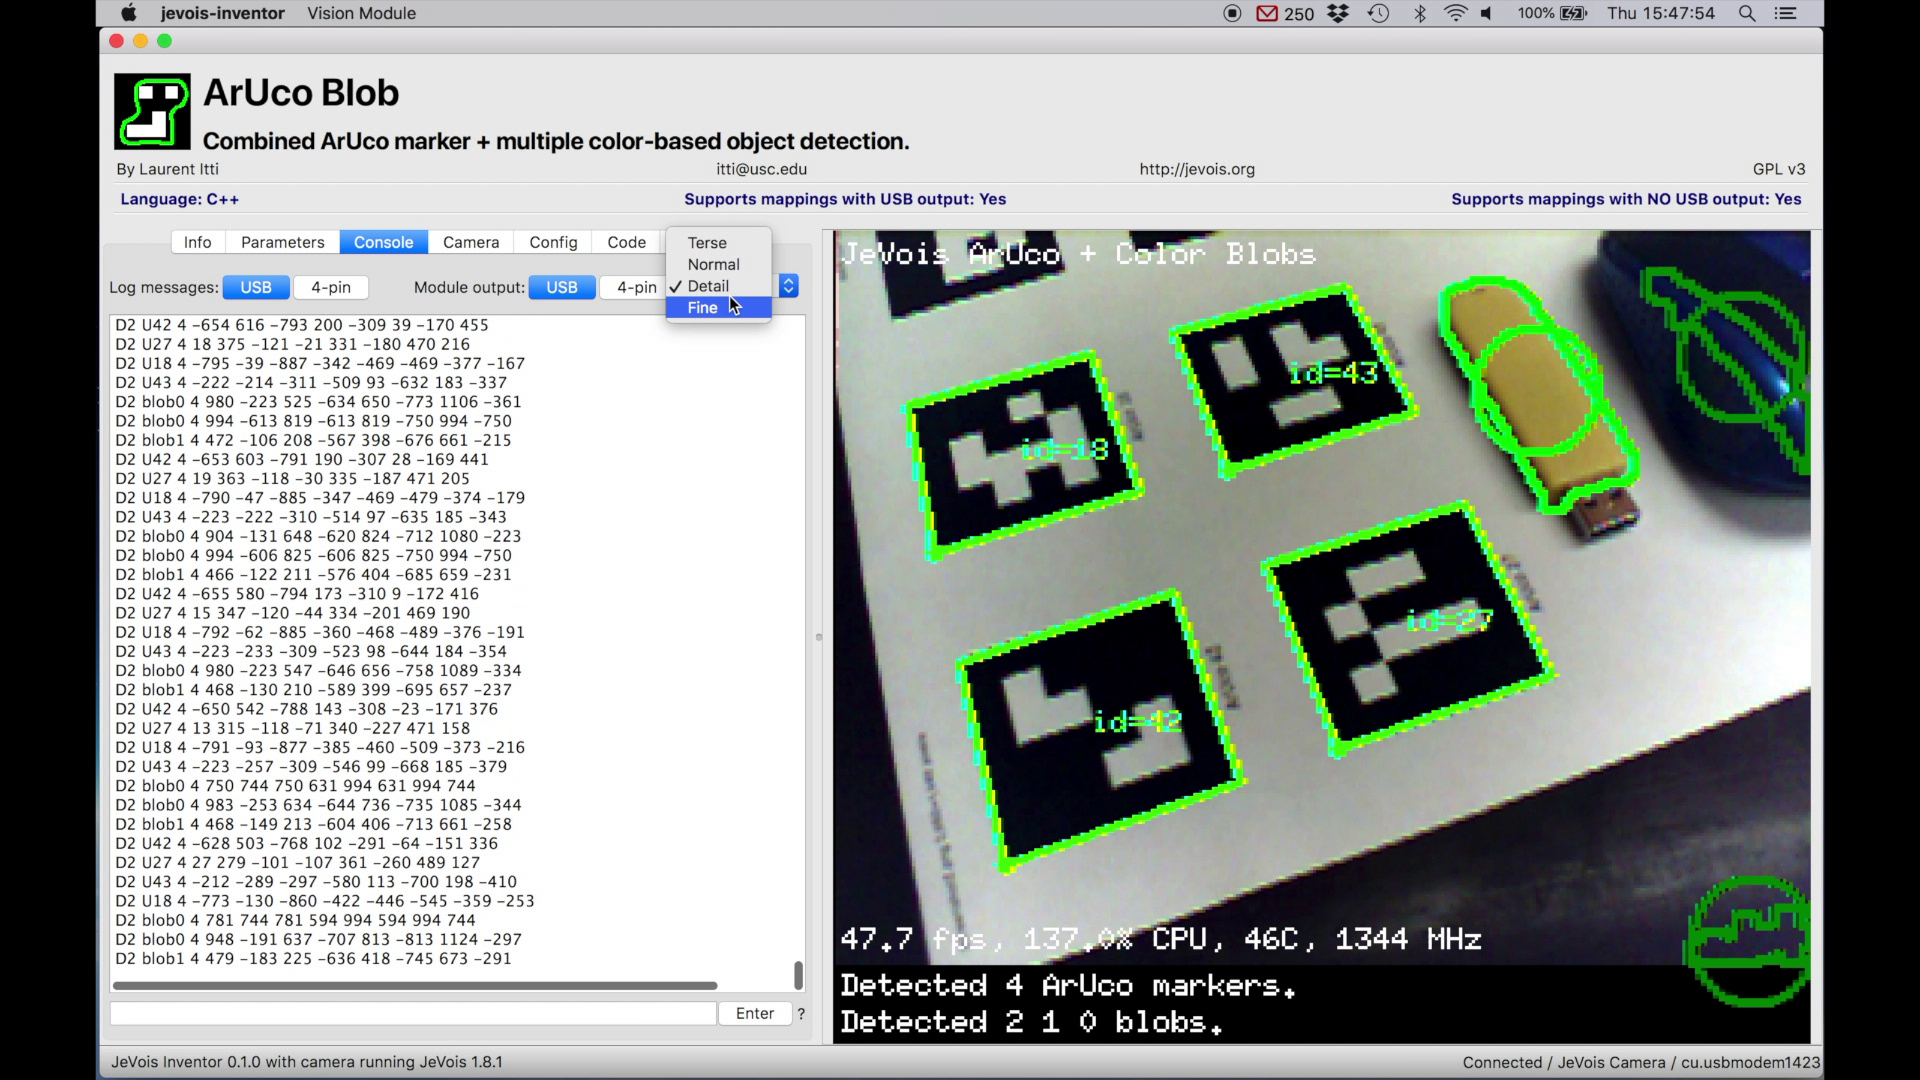
In the example above, JeVois has detected ArUco marker tags (with IDs U42, U27, U18, and U43), two blue color blobs (detected by color detector named blob0), and one yellow blob (detected by blob1). For each detected object, JeVois also sends the 4 normalized (between -1000 and 1000, with 0 at the center) 2D coordinates of their 4 corners (Detail message format).
For more information about these messages and about their level of detail (Terse, Normal, Detail, or Fine), see Standardized serial messages formatting
For more information about the JeVois command-line interface, see Command-line interface user guide
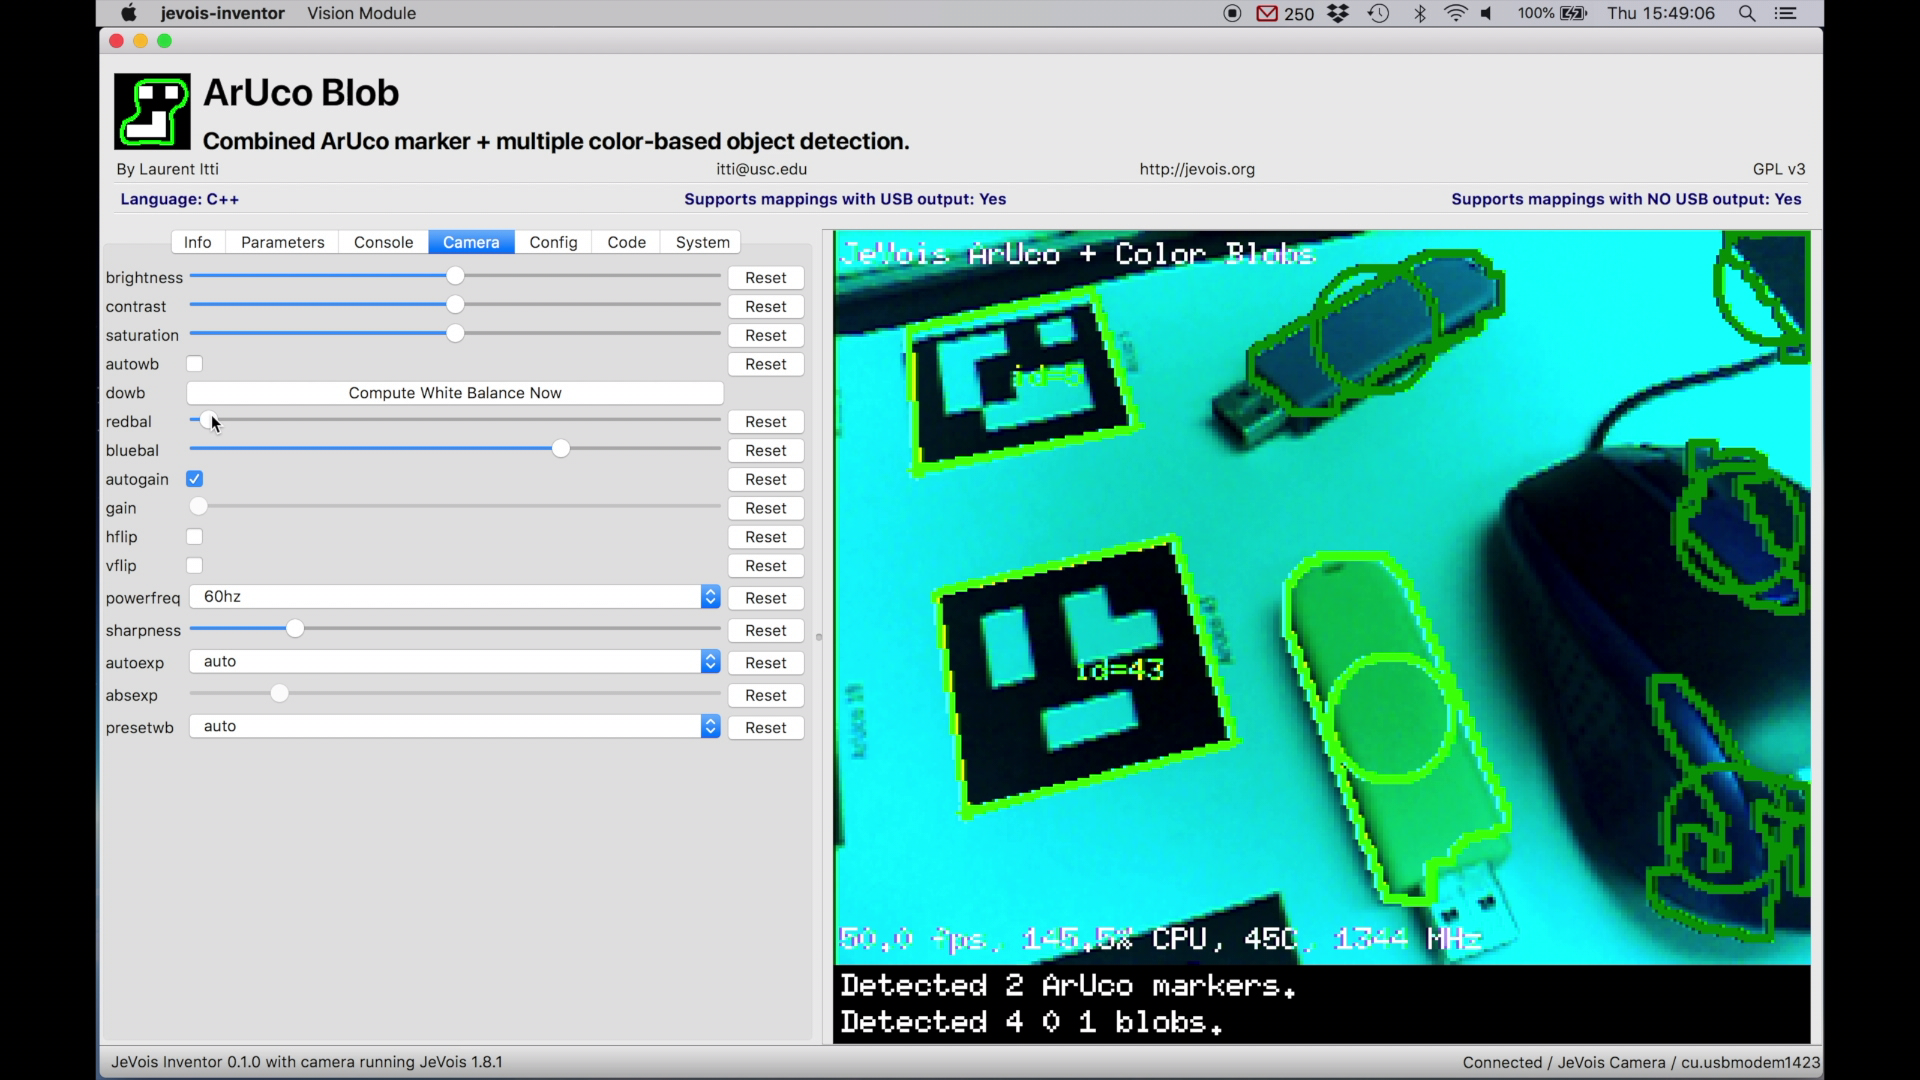
It is sometimes useful to play with low-level camera sensor controls, such as white balance, gain, and exposure, to optimize the performance of a machine vision algorithm. Select the Camera tab to access these sensor controls.
Config files allow one to set some parameters for JeVois or for a given module, to be used every time JeVois starts or every time that module is invoked. You can think of this as setting default preferences for JeVois or for a given module.
Click on the Config tab, and then you can select one of 4 config files:
JeVois videomappings.cfg: This is a list of mappings between video resolutions streamed by JeVois over USB and the corresponding camera sensor resolutions, and which machine vision module to run. This file is how one decides which machine vision module will run on JeVois when a host computer requests a given video format from JeVois.
For more information, see User guide to video modes and mappings
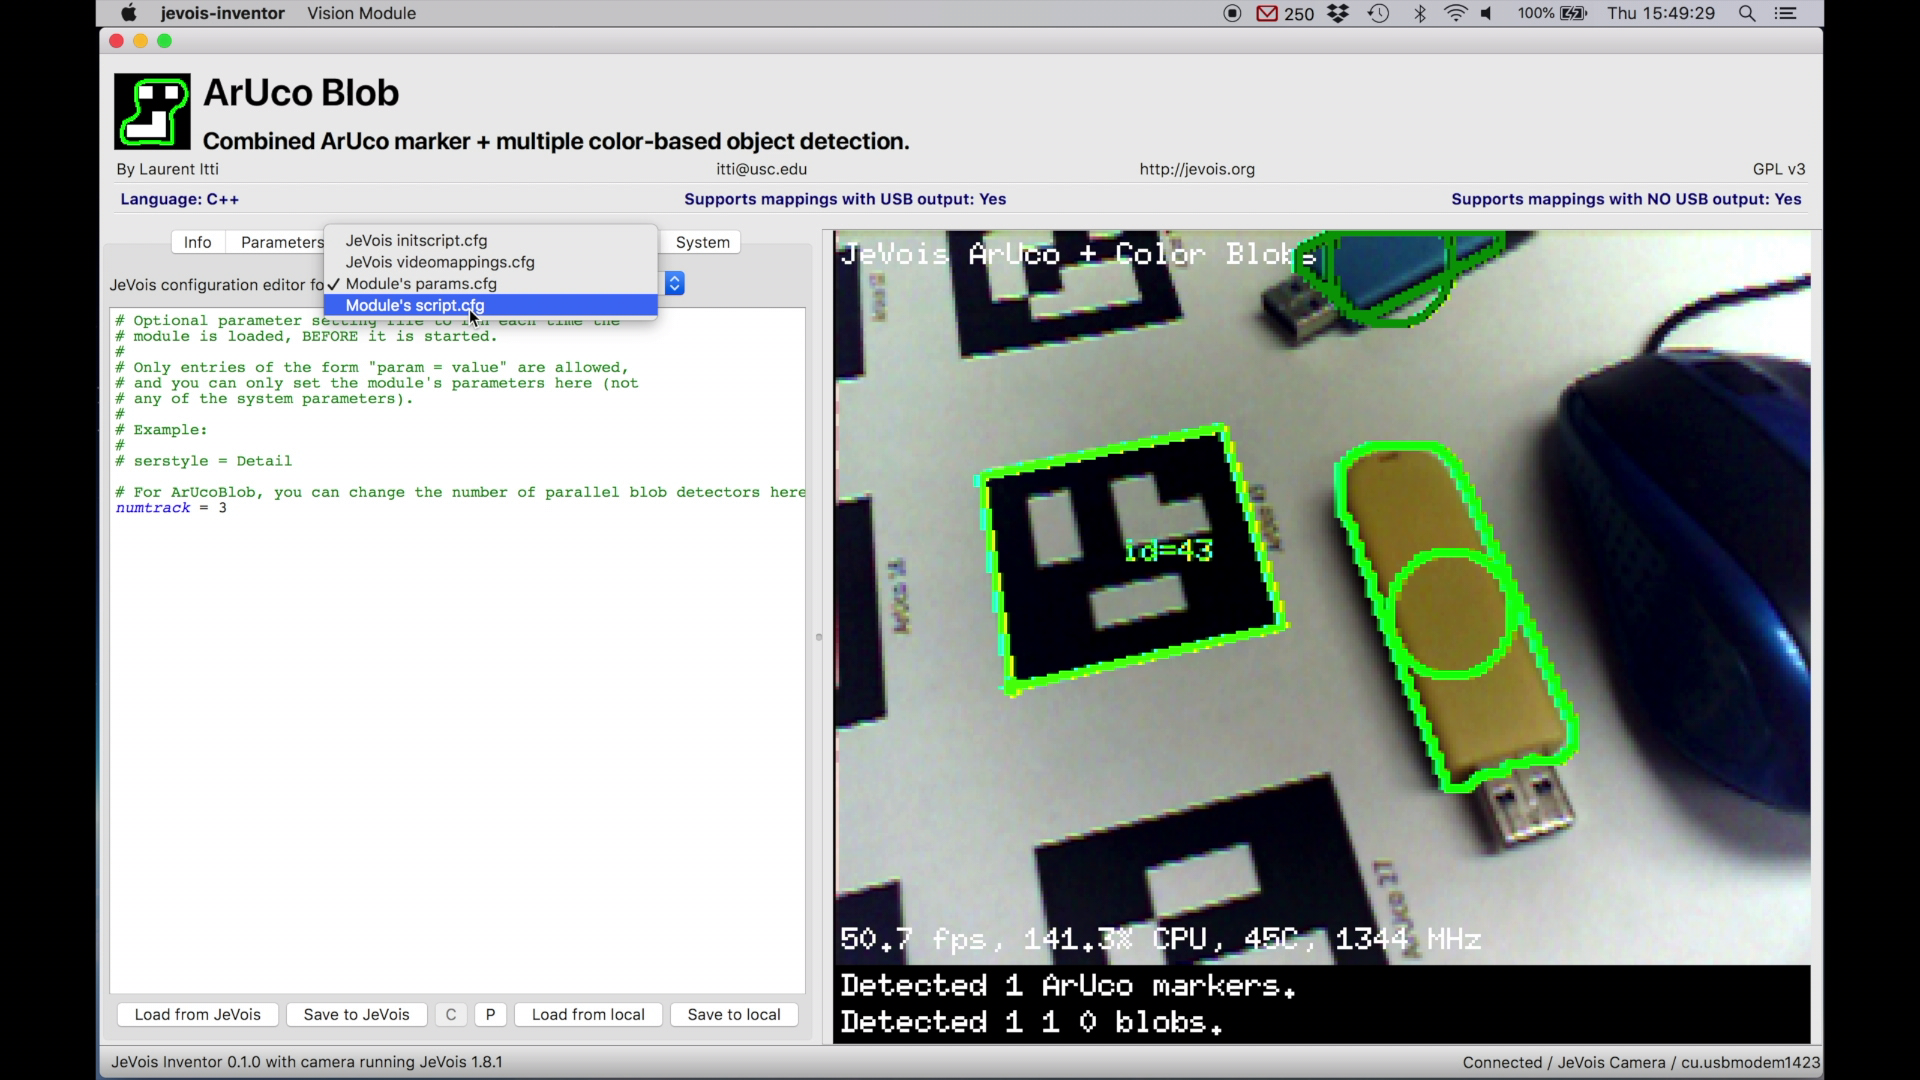
Note the two middle buttons at the bottom:
Select the Code tab to access an editor to the source code of the currently running module.
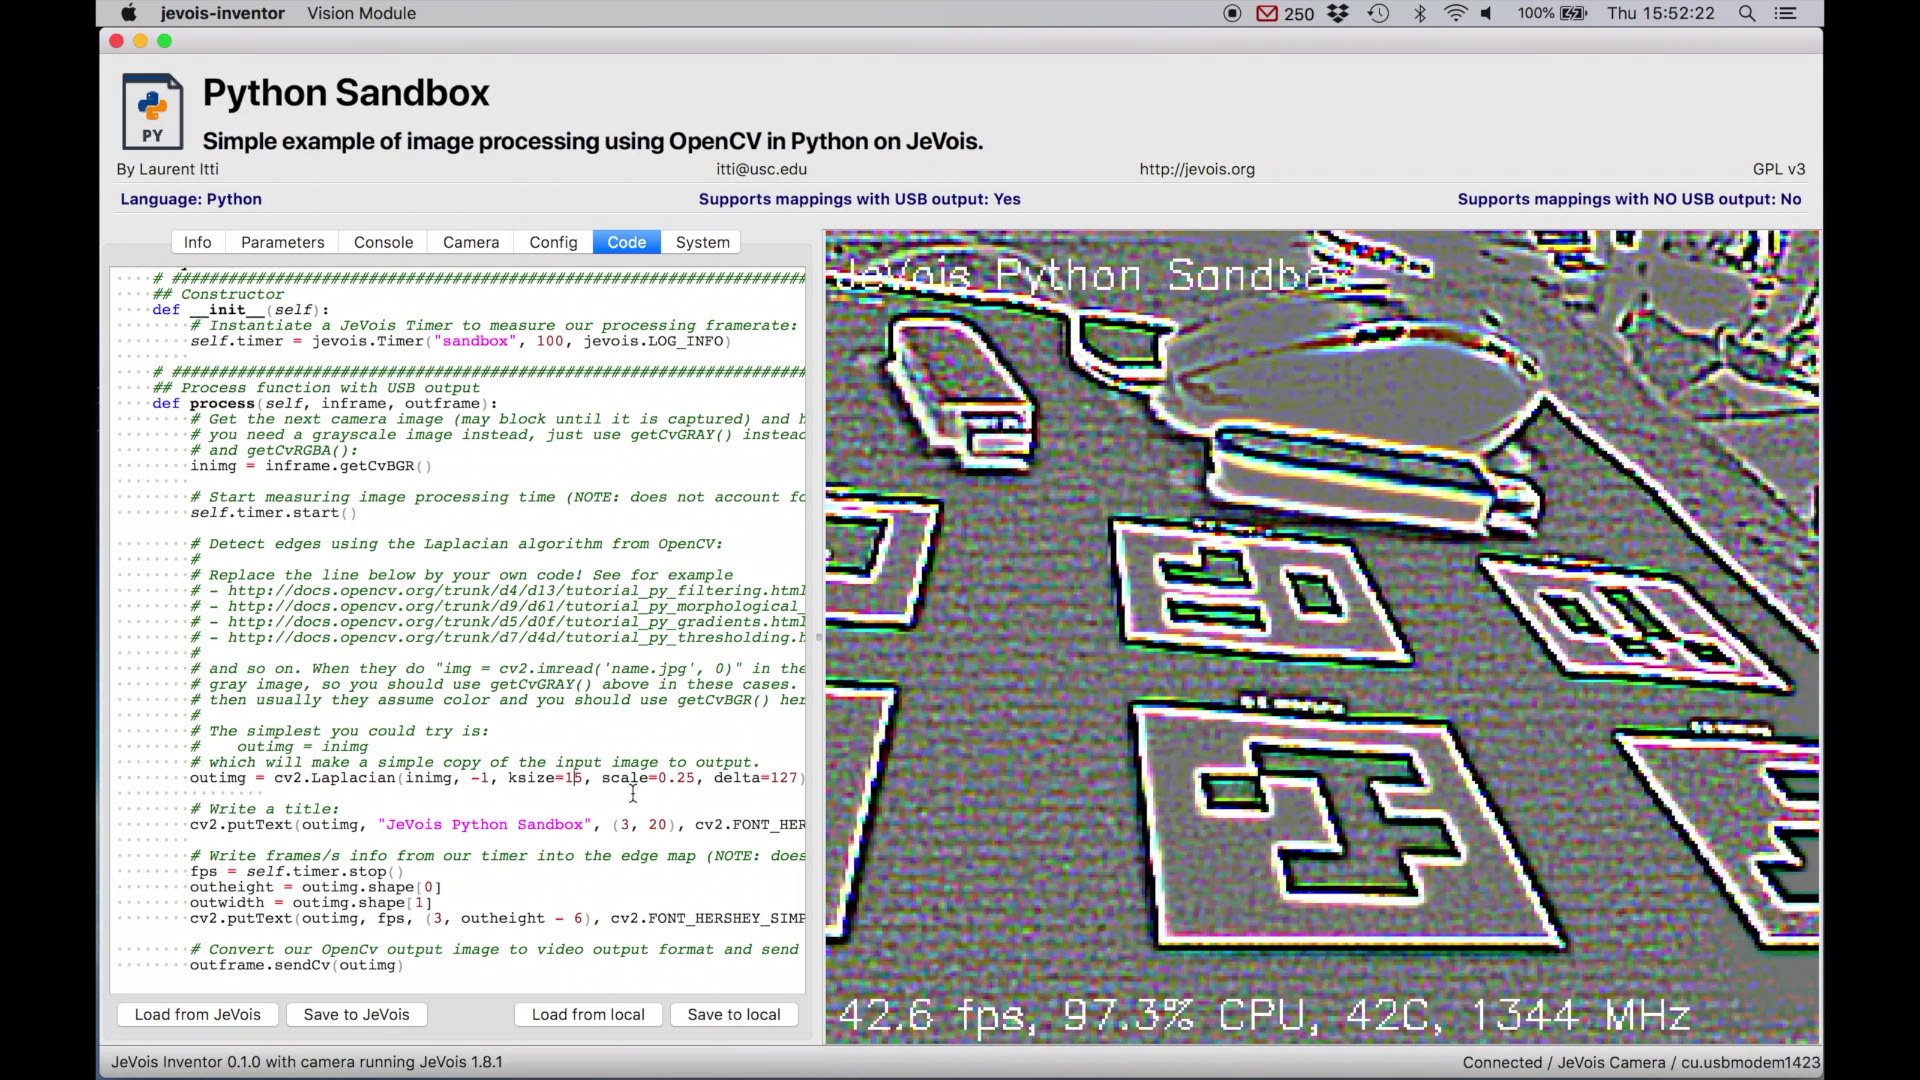
Edit the code, press CTRL-S to save to JeVois, and you will see results immediately.
Don't be shy, just try some OpenCV code and see what happens. The basic idea is that you are given an image inimg from the camera sensor, and your task is to create an output image outimg that will be sent to the host computer over USB.
A few notes about the editor:
RETURN after a :)TAB to add indent, and Shift+TAB to reduce indentSelect New Python Module... from the Vision Module pull-down menu.
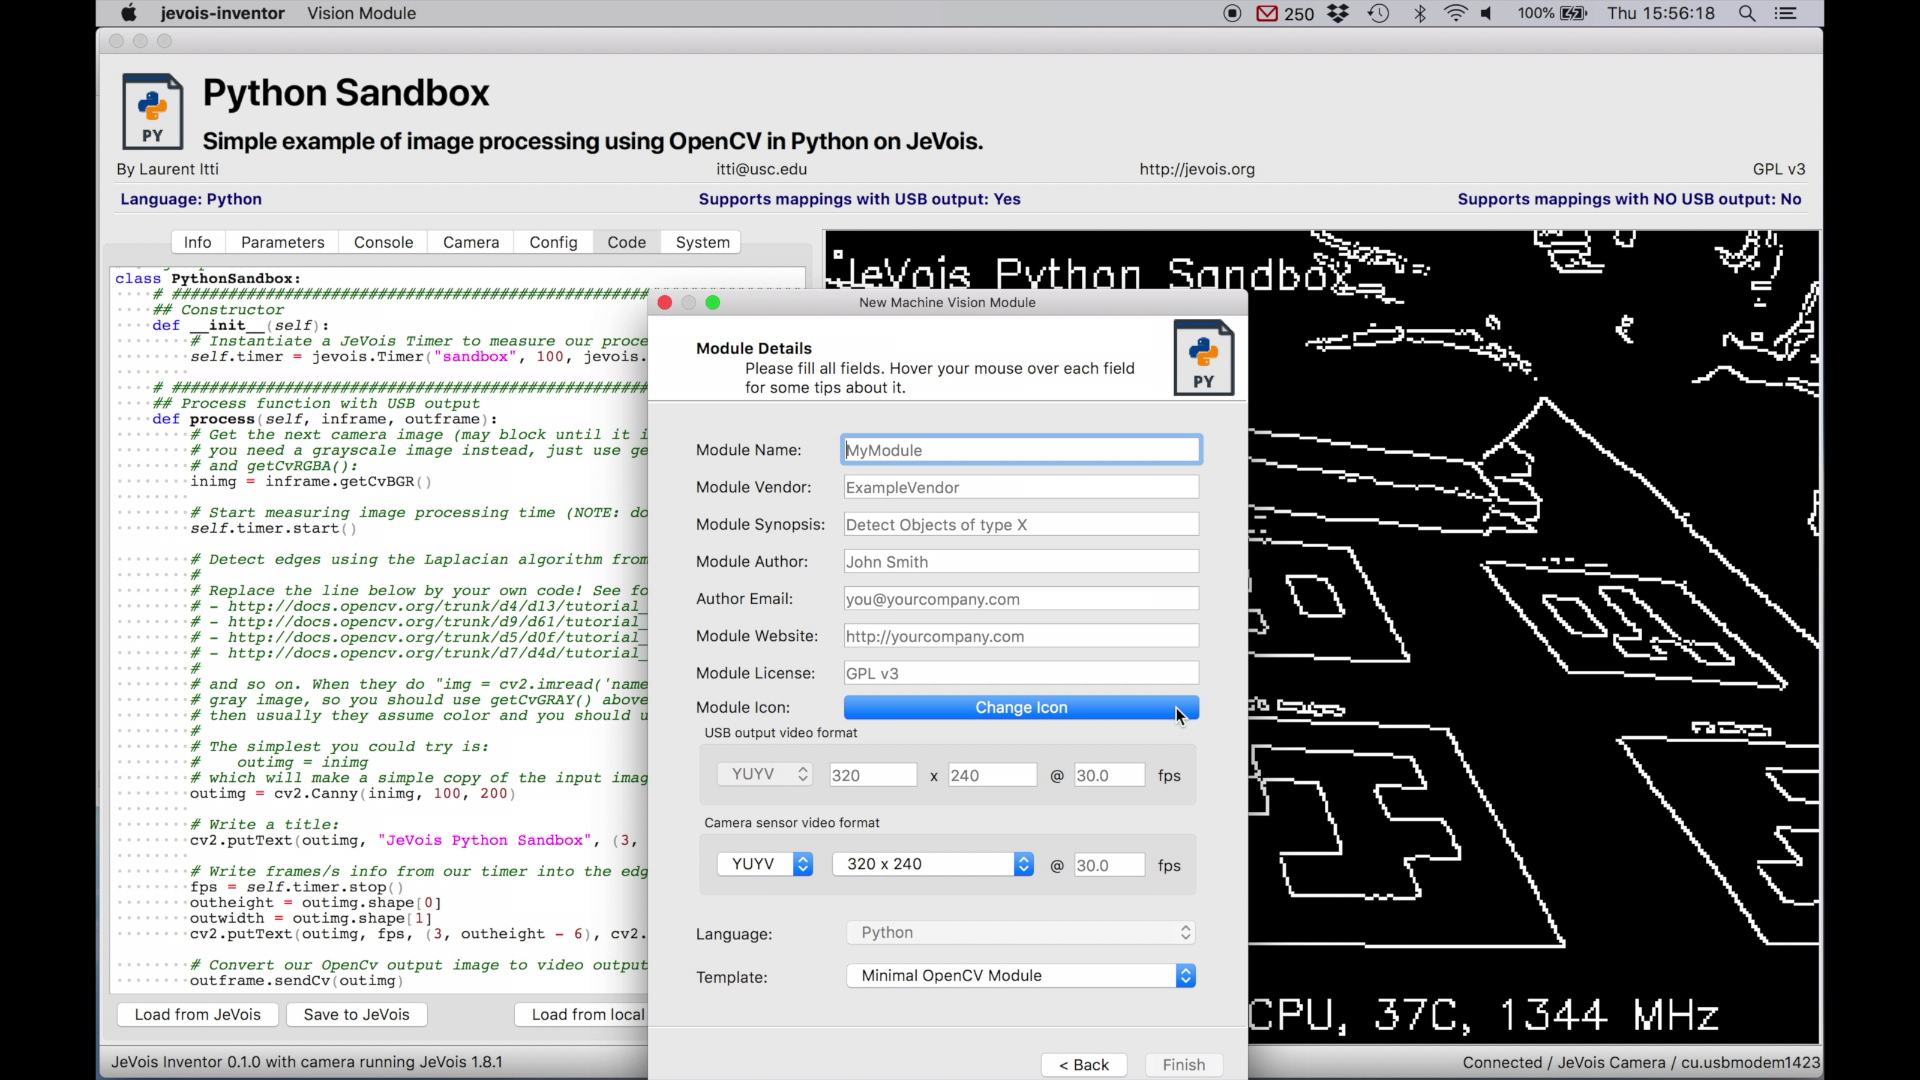
Enter the data. All fields are required. The Finish button will not be enabled until you have entered acceptable data. Hover your mouse over each field to see tips.
For simple modules, you would typically select the same resolution for USB output and camera sensor. For more complex modules, for example showing a side-by-side output with the original video frame at left and the machine vision results at right, they could differ (e.g., in the side-by-side example, camera sensor resolution might be 320x240 and USB output would then be 640x240). It is the responsibility of the module writer to create the output image with correct resolution, which the JeVois core will then send over USB to the host computer.
To get started with writing your new modules, check out Tutorial on how to write new machine vision modules in Python, Programming machine vision modules with Python, and Programmer tutorials
If you want to stop the video stream, use the System tab. This is needed before you start a module in headless mode using the setmapping2 command. See, for example, the tutorial on making a pan/tilt head for JeVois, section on Running with no USB output.
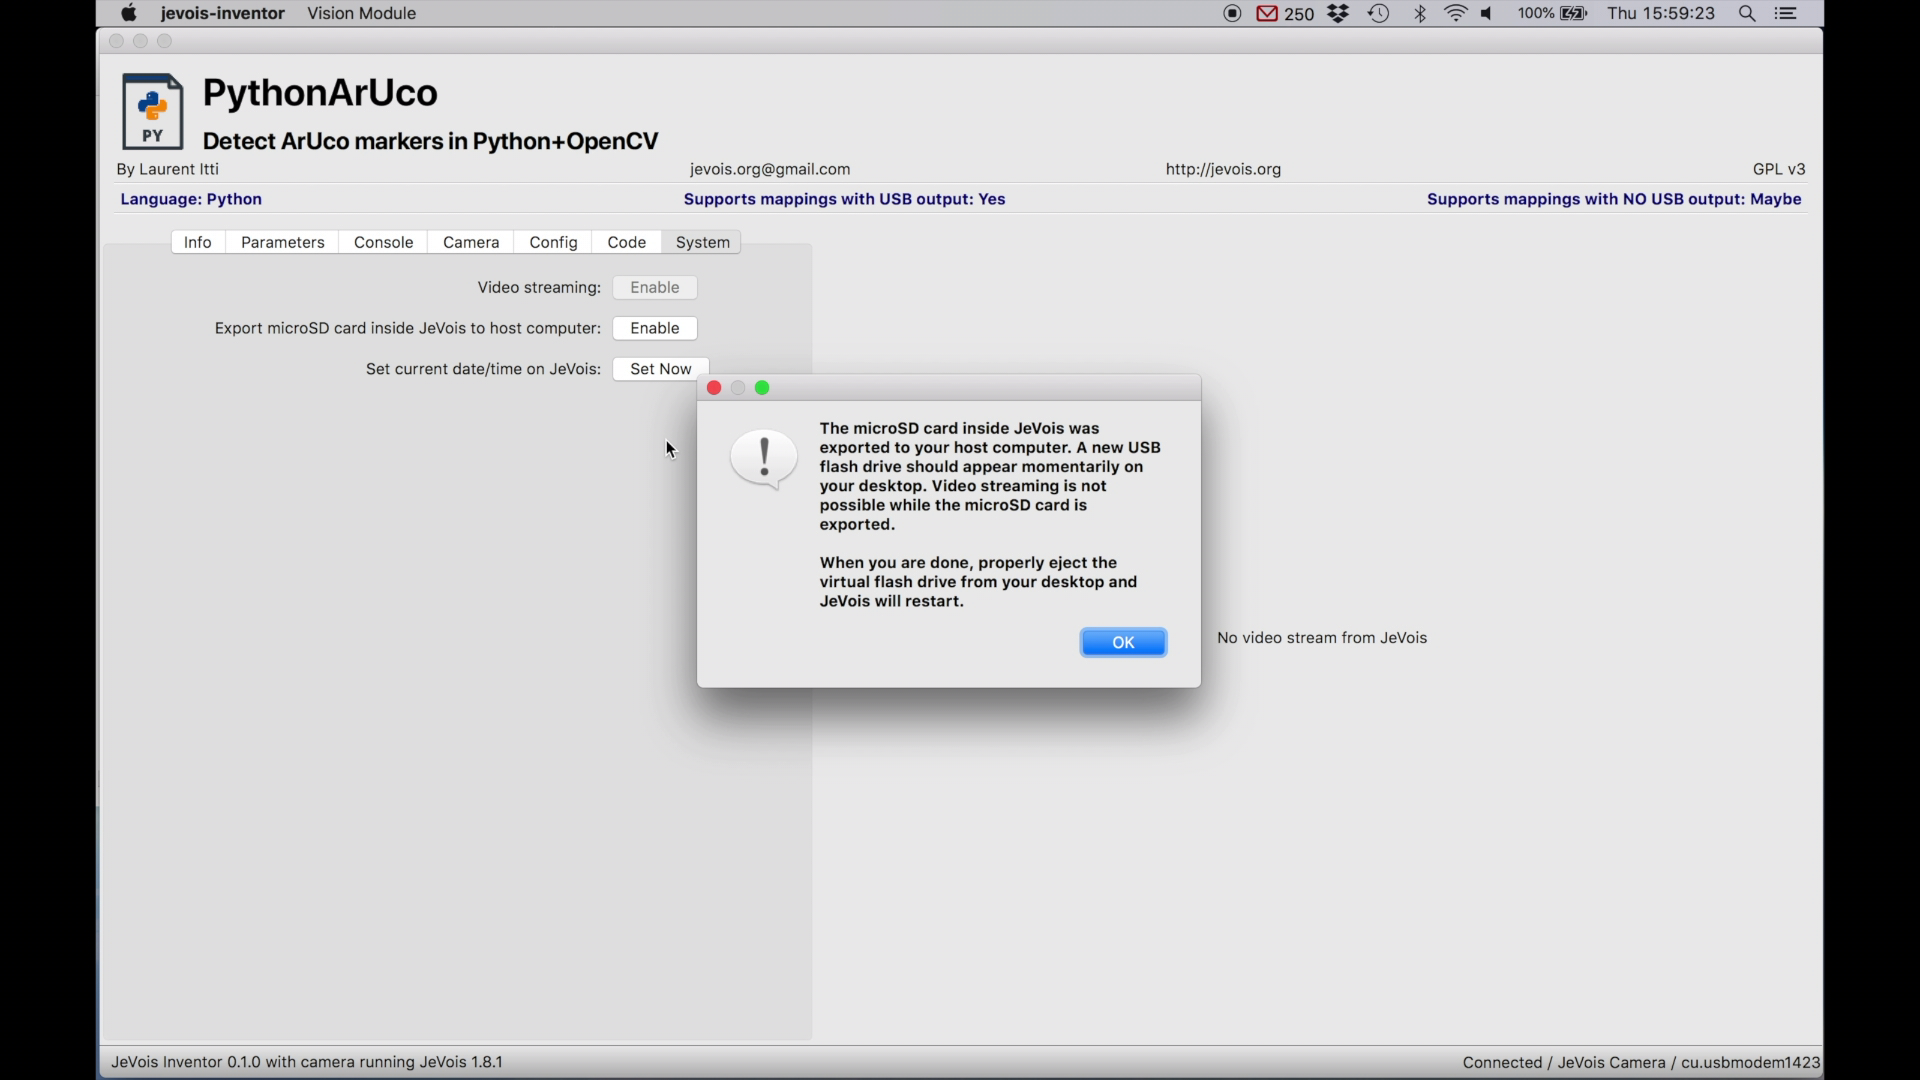
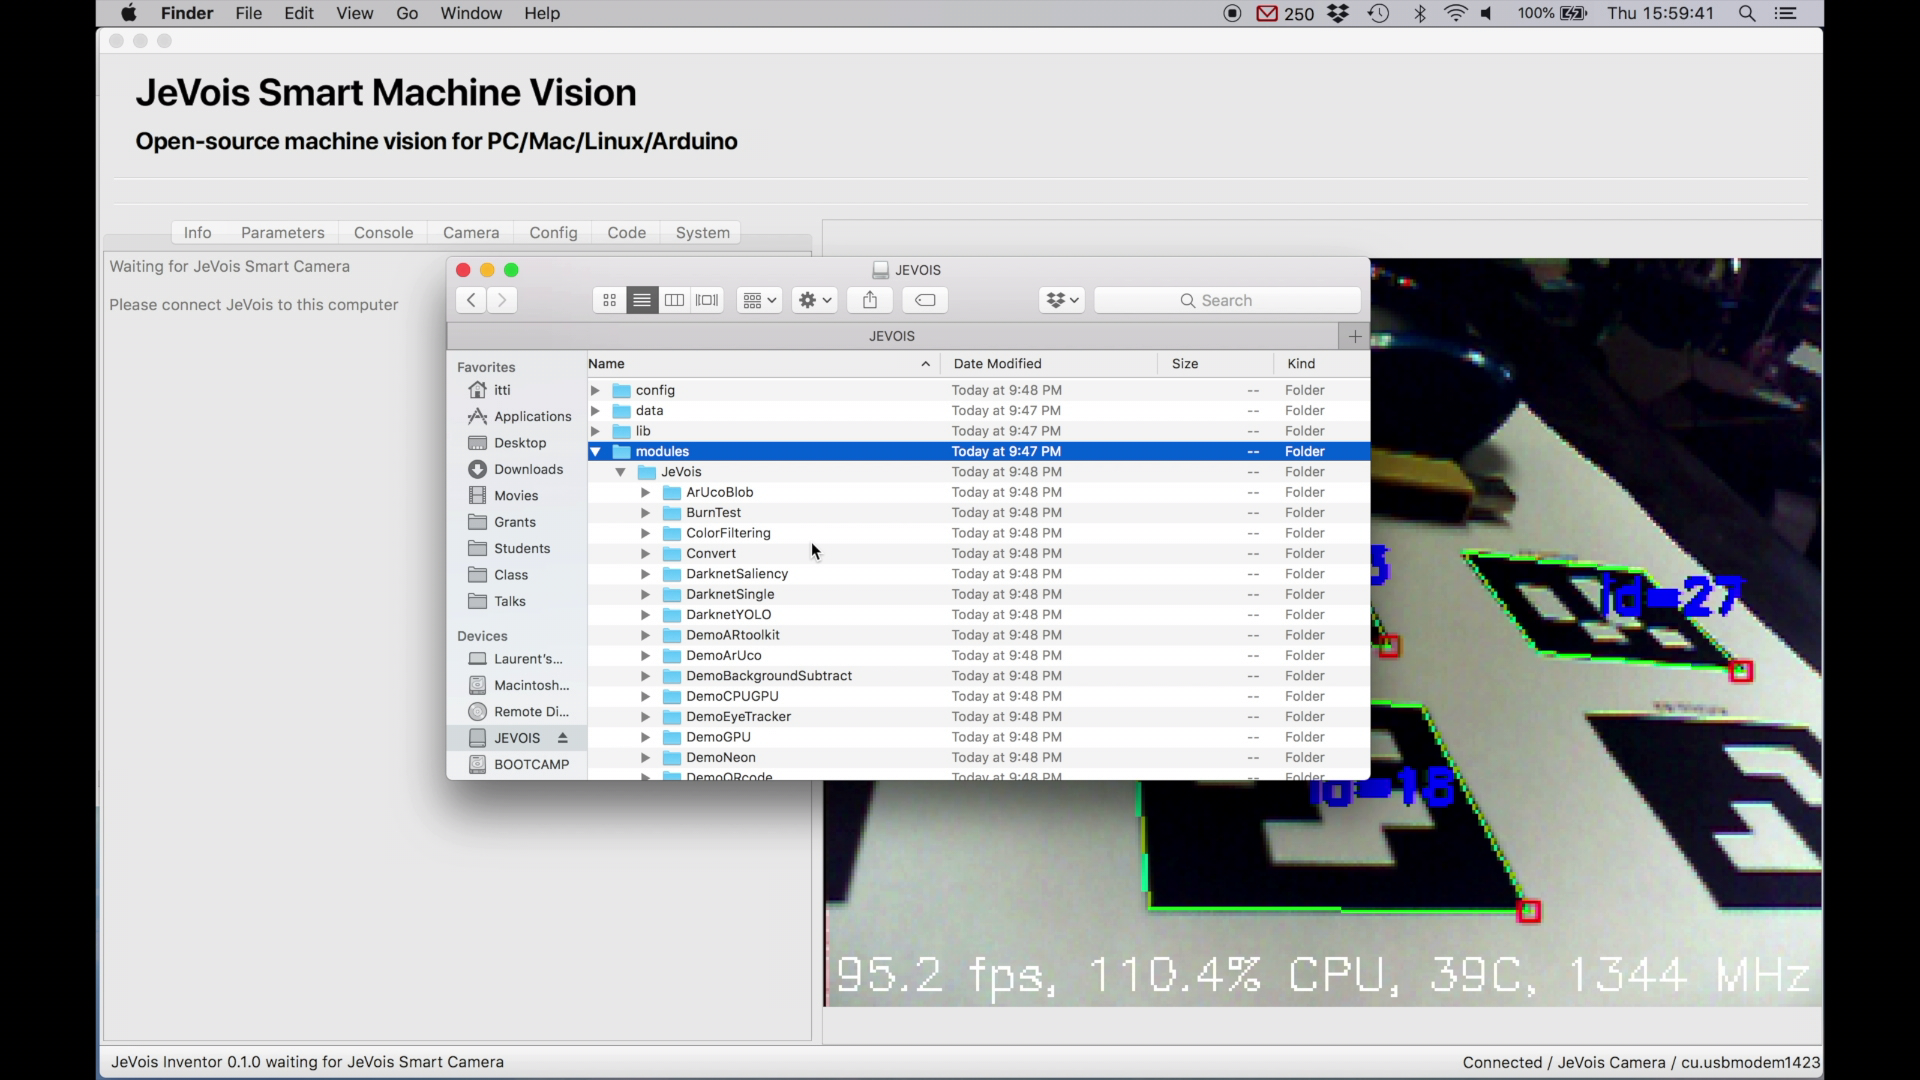
You can also export the microSD inside JeVois as a virtual flash drive to your host computer. Once enabled, a new flash drive should appear on your desktop and you can browse the files on the microSD of JeVois. Very useful to backup your custom modules, or to load your newly trained deep neural networks.
While you are browsing the microSD inside JeVois, you cannot change or use machine vision modules. When you are done, properly eject the virtual USB drive from your host (safely remove, drag to trash, eject button, etc) and JeVois will restart to take into account the changes you have made to its microSD card.
JeVois Inventor is just a simple front-end to the core of JeVois. You can do more with JeVois than what JeVois Inventor supports. See http://jevois.org/doc/ for more comprehensive documentation.
In particular, check out:
JeVois Inventor 0.1.0
JeVois Inventor 0.2.0
JeVois Inventor tries to detect the JeVois camera automatically, so that you do not have to select its device each time you start the inventor or restart the camera.
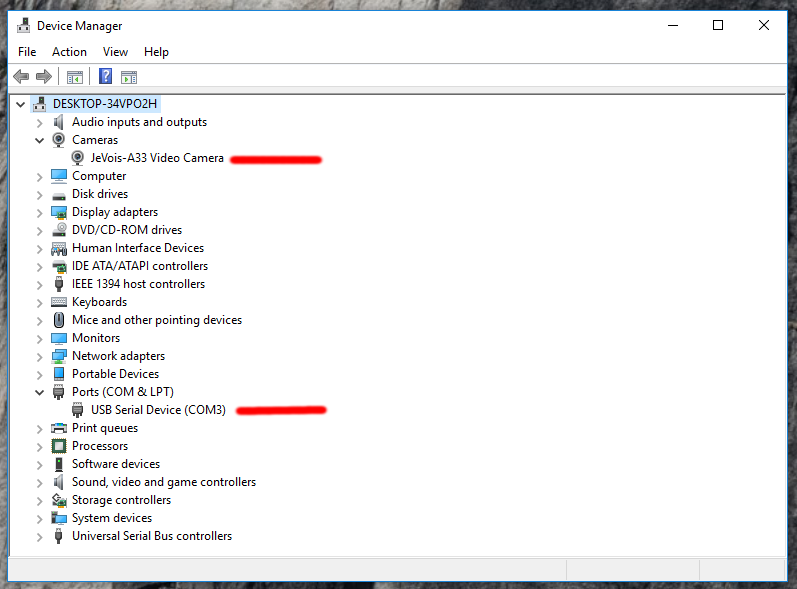
The JeVois Smart Camera is a composite USB device with three sub-devices:
To work, JeVois Inventor needs to detect at least the first two sub-devices. On Linux and MacOS, this works well by enumerating all connected cameras and serial ports, and finding the one that has the word JeVois in its Manufacturer or Product descriptions.
However, this functionality (provided by the Qt toolkit of widgets which JeVois Inventor is programmed with) does not seem to work well on Windows platforms. Even though the JeVois camera sends manufacturer and product descriptions to the host computer when it is connected, those just seem to be ignored by Windows. Windows instead assigns names to JeVois that appear to be whatever names are present in driver (.inf) files previously loaded on your computer.
Try the following if your JeVois camera is not detected by the Inventor:
jevois-serial.inf as explained in Connecting to JeVois using serial-over-USB: Windows host to install the correct USB-serial driver. Depending on your Windows version and history of installed drivers, these names will vary widely. They will correctly contain the word JeVois if you have not previously used USB cameras or serial-over-USB adapters on your computer (i.e., JeVois is the first such device detected, and Windows will then fetch and use the correct name advertized by the device).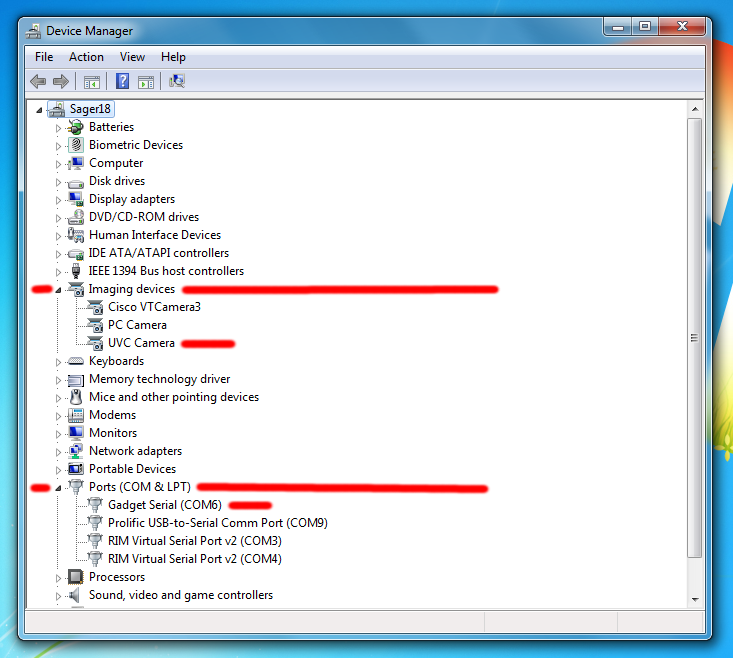
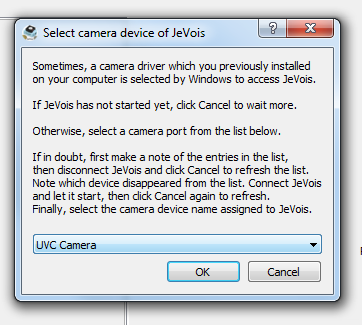
jevois-serial.inf as explained in Connecting to JeVois using serial-over-USB: Windows host to install the correct driver.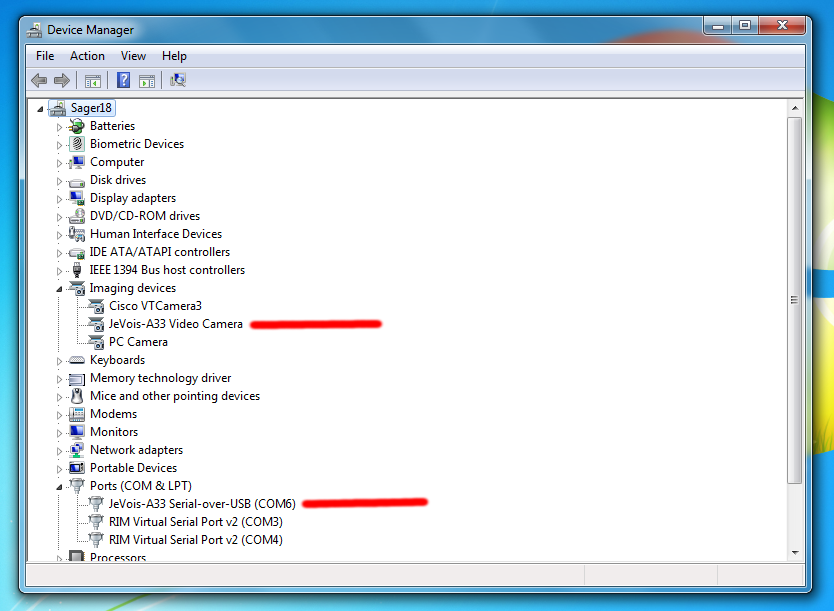
 1.9.8
1.9.8
